|
Index
Plot
Intro
Submerged Ruins
Besaid
Kilika
Luca
High Road
Mushroom Rock
Djose Temple
Moonflow
Thunder Plains
Macalania Woods
Lake Macalania
Bickanel Island
Bevelle
Calm Lands
Mt. Gagazet
Zanarkand
Highbridge/Temples
Sin
Side Quests
Arena
Misc Quests
Gatekeepers
Omega Ruins
Single Page Version
|
|
Zanarkand
Intro
Head forward to where everyone else is. Remember this scene? After watching it again,
save and head out. Re-equip your capture weapons, if you are doing that. There is a
chest around the first bend with a fortune sphere in it. After a while, there's a cut
scene ('looks like the farplain'). Around the next bend is another chest, this one
with a spiritual targe. Head down the road until you get transported magically to the
stadium at Zanarkand, aka 'Dome.'
Dome
You cannot capture fiends here, so go ahead and switch to different weapons.
Head forward, then down the path. For fun, throw pheonix downs on the zombies. :) If
you run across any Defender Z enemies, they give you Level 2 Key Spheres normally, but
will occasionally give you Level 3 Key Spheres (uncommon drop). To make sure you make
the most of this, be sure to Armor Break them and have your best guardian Overkill
them. You'll go through a litte tunnel looking thing. At one point, you can actually
walk up onto the top of the ramp for a chest with 10,000 Gil. Up the ramp is a save
point.
A litle further on is a chest to your right. Open it for a friend sphere. From
there, head forward and turn left. When you see Auron, Jecht and Braska look hard left
for a ramp heading down, you can go there for a level 3 key-sphere. Forward from that
(through the portal) you will find a chest with a luck sphere. Up the stairs is a save
sphere, then throught the door is the trials.
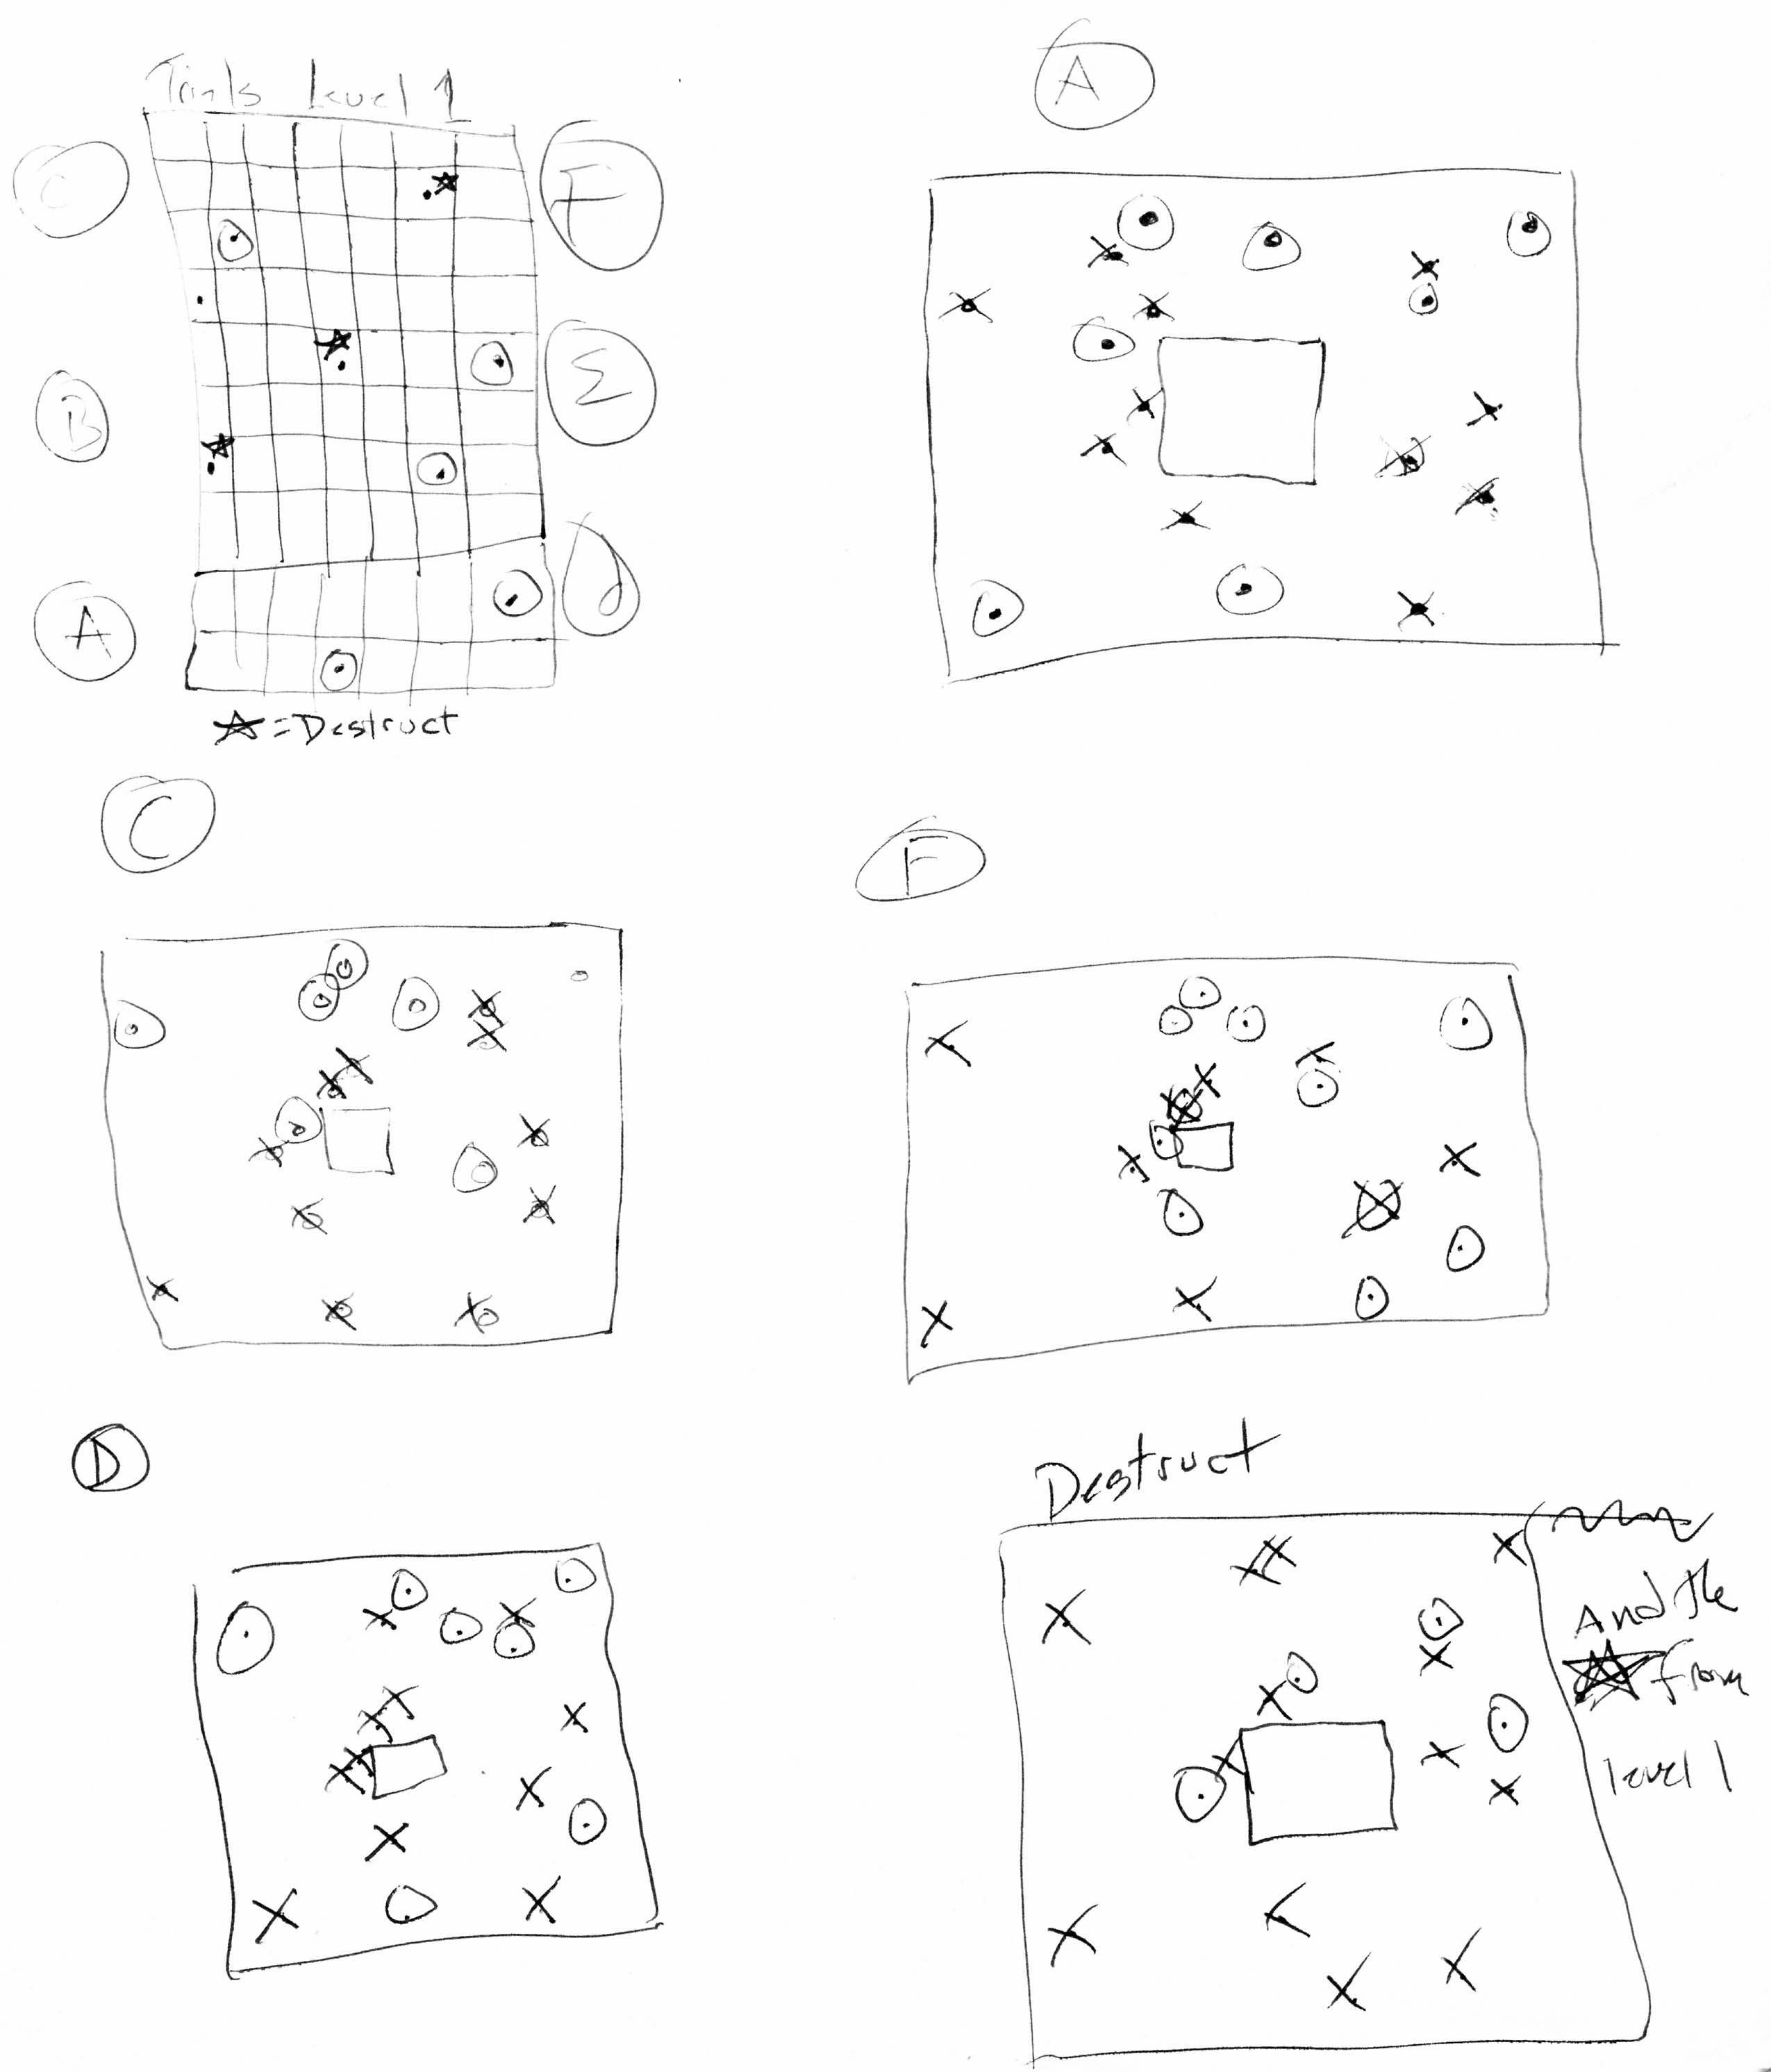
Cloister of Trials
- See attached diagram (Just FYI: You can use
right-click and "open in new window" or "open in new tab" to keep from leaving this
walkthrough). There are a bunch of dots here. To begin, step on the green dot directly
in front of you. Then just step on the ones that correspond to the OBJECTS shown - not
the LOCATION. See the attached graphic, and step on the circled dots in the upper left
drawing on that image.
- When the pedistals are revealed head through the door at the top of the screen.
- In the next room, approach the screen at the top, and remove the left hand
sphere. It should be a "Kilika Sphere." Now put it back.
- Return to the previous room, and push in the lower left pedistal (action button,
not just running against it). Refer to the Diagram labeled "A" on the aforementioned
attachment. You'll want to go back to the room where you found the Kikika Sphere and
step on the appropriate dots. (NOTE: I screwed up on one of those - there's one circle
I crossed out after words.) The elevator in the middle of the room should have the
lower left symbol lit up now.
- Go back to the entry room and push in the left top pedistal.
- Return to the other room and step on the dots in diagram 'Dome C'. The lower
right should light up.
- Repeat for top right pedistal (Dome F). Center bottom lights up.
- ... and bottom right pedistal (Dome D). Upper right lights up.
- Go to the display in the room with the spheres, and remove the kilika sphere (on
the left).
- Place it in the middle left pedistal in the other room. The upper left should
light up.
- Go back and get the Besaid Sphere (on the right) and place it in the pedistal in
the right middle. All lights should turn on, and the elevator should show up.
- Everything starts glowing and a save sphere shows up. USE IT! (Unless you think
you would LIKE to do that again?!?
- When you return to the room where you found the spheres, you'll be jumping
directly into a fight; if you have armor to prevent Berserk, be sure to enable it.
You're welcome. ;)
Boss: Spectral Keeper
Now you fight the Spectral Keeper. If you hit him, he'll attack everything in
front of him (that's direct, front left and front right.) Stay out of sight, if you
can. Use hastaga to have enough turns. Hit him with Mental Break early on. Tripple
Foul will net a Silence status change. You can steal Ethers from him - I recommend
stealing when an attack would damage a party member. Use the Overdrives of the Aeons,
if you can. Use remedies to keep your guys from being berserk. He's immune to most
things, but especially Power Break, Armor Break, Slow, and Delay (the things I usually
like to do).
Since the Spectral Keeper drops Level 4 Key Spheres, I recommend on Overkill if
at all possible. I like to use overdrives for the first 4 aeons, then bring in bahamut
for a Megaflare to smack him down. Watch out for the glyph mines, though, as they can
kill your aeons with a single shot. When he drops them, dismiss and live to fight
another day. After killing him, you'll head down the elevator.
There's a save point here, ignore it for now. Follow Yuna through the opening,
then through the glowing blue door. After a long discussion, you'll have control
again. Now go save your game. Really. These are LONG discussions, and you don't want
to have to listen to all that again. Recharge your aeons too. Trust me. BTW: This can
easily be a 30 min battle if you characters are not that strong, so don't start unless
you have time (or don't mind pausing...)
When you are ready, follow Yunalesca into the temple. To the best of my
knowledge, there are no chests in any of these areas (except the one that Yunalesca's
"clothing" fails to hide). This time I just went after her with the aeons (not fully
charged). I died. Go back and recharge your aeons. It's not worth it otherwise. She
goes through 3 forms and the last one is the nastiest. Save your aeons for that one.
If you get zombied, you are occasionally immune to all status bonuses. Oh, and she'll
cast "regen" to make your guys die faster (If you are zombied, you'll get hurt by
healing magick.) You can use Holy Water to cure zombie, then hastaga again, but my
strategy is to use Dispel to get rid of Regen instead. Note that your haste will go
away, too.
By the time I got here, I had the following skills: Hastaga, Holy, and Quick
Hit. These were very useful to have! Use haste and remedies to get past the first two
stages. I used Tidus, Wakka and Auron. Be sure at this point that you have AT LEAST
ONE ZOMBIE AT ALL TIMES! Zombies are immune to death attacks, and she can kill all
your party at once with a megadeath attack. My strategy is basically: Keep everyone
hasted and don't bother clearing out the Zombie status. Wakka was able to hit for 9999
and Tidus could caste hastaga to keep everyone hasted. Yuna was also on board and able
to call fully charged, but I only attacked during the first two stages. On the third
stage, I called in Yuna and had her start calling Aeons. Yunalesca will cast Mind
Blast (confuse and curse), Absorb (steal HP) and Osmose (steal MP). This renders your
aeons unable to charge their overdrive as well as no magic to restore HP. If they
actually manage to survive through her attacks, just dismiss them.
Between Holy and throwing away my aeons, I was able to whittle her down. When
she had less than 10K HP, I called in Bahamut. Megaflare hit her for 57,118. Needless
to say, this was an Overkill. XD I LOVE Bahamut! I'm not sure why, but even with the
Overkill, I only got Level 3 Key Spheres from this battle. Whatever. Head back out and
save at the save point. You really don't want to have to do that again, do you? But
before you leave via that elevator, go back to where you fought Yunalesca and head
down the stairs at the back of the area. You should appear atop one of the other
stairways. Toward the far end of the screen, you should now see a chest. Open that for
the Sun Crest.
Go up the stairway you just went down, and then take the stairs at the bottom to
get back to the save point. Take the elevator back up and leave the dome. Almost
immediately you'll appear outside, but it's not obvious you are there. Walk toward the
camera for your first real look at sin. Anyone have any idea just what the heck that's
supposed to be, anyway? Eventually you will be back on the ship. Talk to everyone.
Yuna is up right before the deck. Go talk to her for a plan. Head back to Cid and
explain it to him. You are now free to engage in almost every side quest!
Don't forget to come BACK to the Zanarkand Ruins as soon as you have control of
the airship; you want the destruct sphere. When you return, enable all the WHITE
SQUARE pieces (see the astrisked part of the first room on the attached sheet, as well
as the lower right corner of that sheet. When you've touched them all, the monitor in
the first room will open up and show you a pedistal. Grab the Destruct Sphere and
place it in the RIGHT sphere recess on the elevator screen. You should now get a chest
containing the Magistral Rod. Now you can return to the Airship and engage in any
other side quests you want.
By the way... If your guys are really low level and you want to level 'em up a
bit, there's a trick you can do at Macalania temple - if you have a controler with a
turbo button. Since the enemies will keep coming, you can have your guys just wait at
the entrace to the temple. By this point they should be powerful enough that you can
just let them sit there. (I spent about 10 - 15 hours and Tidus, Wakka and Auron went
up 99 levels. 10 more and they do another 60 levels. You actually can't do much past
that.) This is the easiest way to earn spheres, also. If you have the patience, you
can check in every hour or so and use the extra spheres to level up your aeons (you
have the Aeon's Soul already, right?) After you do the Highbridge/Sin deal, you will
NOT be able to enter Macalania Temple, so this is not going to be around much longer;
if you want to try it out, you'd better do it here.
When you are ready to advance the plot, head to Highbridge. While you COULD go
capture fiends at this point, you'll want to go to Highbridge first as it will open
your ability to revisit the temples while you're catching fiends.
|